
1. Gather Materials: Seeds, Soil and Containers
- Seeds: Think of the amazing plants you could start in your house! Yellow and red bicolor heirloom tomatoes, white, green AND purple eggplants; sweet mini peppers! After dreaming about those amazing colors and tastes, make your final choices and order seeds from your favorite seed companies.
- Soil: Barter, buy or steal some potting soil. Just kidding, don’t s
 teal it. Stealing is wrong. I would never do that. Also, even though it is tempting to use soil from your garden outside, you don’t want to do this because the soil is too dense. And frozen if you live where I live. You can either get pre-made seed starting soil mix or make your own. If you make your own, you should use 4 parts screened compost, 1 part perlite, 1 part vermiculite, 2 parts coir (coconut fiber)/peat. See Rodale’s Blend your Own Seedling-Starting Mix for more information about this. This year I have decided to use pre-mixed Johnny’s 512 (organic) mix.
 - Containers: You can grow seedlings in anything: old yogurt containers, old take-out containers, small plastic cups, molded newspaper pots, etc.

 Old food trays
For larger scale seed-starting, however, the best way to maximize space is to use standard 1020 trays because they are built to fit tightly together and hold all sorts of different soil-holding containers (cells). There are many options when it comes to what to put inside the trays: all sorts circular and square shaped cell packs with enough spots for anywhere from 12-200 seedlings per tray. You can choose the material of the cell: peat pots, composted cow manure pots (it’s a real thing), plastic pots or believe it or not-no pots at all- using soil blocks. Soil blocks are cool because you use a mold to shape the soil into squares and plant the seeds into the soil blocks, which sit in leak-proof trays. This method requires more up front work but helps tremendously with transplant shock. More about soil blocks in a later post.
Instead, I will suggest the tried and true fossil-fuel sucking, environmentally poor, but super convenient choice of plastic containers. I am using a variety of plastic flats to start small seedlings and then will transplant them into larger cells/pots once the plants have 2-4 true leaves. You can get these at a hardware store, local nursery or order them online from a variety of sources. This year I ordered from Organic Growers Supply (a division of Fedco), Johnny’s Selected Seeds and Greenhouse Megastore.
You can think about the overall tray set up like a simple sandwich: 2 pieces of bread and one slice of cheese in the middle, 3 parts that fit together for initial seed germination.


The bottom piece of bread is the bottom tray– purpose being to collect water that seeps out of the soil-filled cells. However, am important aspect of the tray is that there are drainage areas: to encourage airflow and to reduce the occurrence of fungal diseases like damping off. For actual information about damping off from the University of Minnesota, click here.
Damping off is the number one fungal enemy of plant starts. It is like making your cute little cheese sandwich, putting it on a plate, grabbing a glass of water and then turning back to find your amazing sandwich covered with mold. Then you can’t eat your sandwich, and it shrivels up right before your eyes. And don’t breathe in the spores if you have allergies. Then you might have an asthma attack. Ever read the book If you Give a Mouse a Cookie? It’s like that. Just remember-airflow is good. If fact, when the seedlings get large enough, I will get rid of the bottom trays altogether and put the cells on the wire rack shelves.
The middle (cheese) part of the sandwich is the soil-holding tray or cells, which were discussed above.
The top piece of bread is a clear dome which serves several purposes. First, it helps the soil from drying out before the seeds germinate. When the water evaporates from the warm soil, the water condenses on the underside of the dome and the water falls back to the soil- a closed system. Remember the water cycle that you learned about in elementary school? With the arrows? It’s just like that. Here is a close up of a dome filled with condensation. 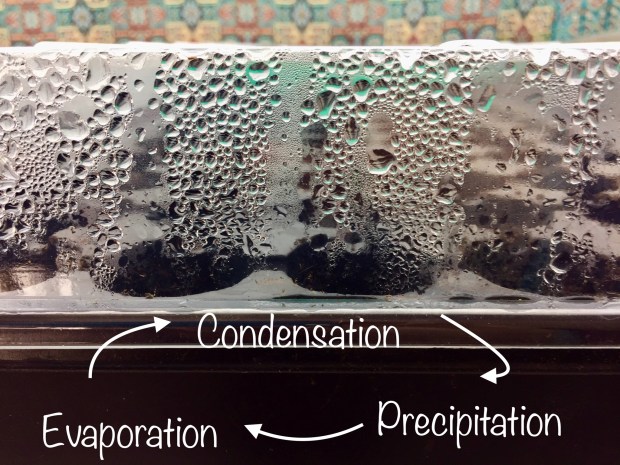 Secondly, the clear dome allows light to hit the soil. Many, though not all, seeds require light for germination. Finally, the dome helps to hold the heat from the lights and heat mat in the closed system- just like a little greenhouse.
Despite all of these wonderful dome attributes during seed germination, once the seeds sprout and begin to grow into little plants, the dome becomes dangerous to them, just like when Angel turned evil at the end of Season 3 in Buffy the Vampire Slayer. Did you know that iconic Joss Whedon show turns 20 this year? I digress… The dome must be removed from the seedlings when they start growing to allow for air flow and reduce the chance of damping off. You know what horrible end of days damping off can bring on…
2. Find your planting zone using the USDA Planting Zone Map . 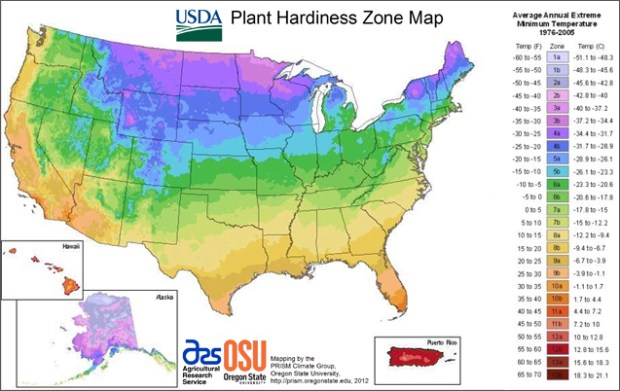
3. Look up the last frost date in your zone.
(For example, I am in eastern Massachusetts and plant according to the Zone 6a dates, my average last frost date is May 15th). Use this general map to see last frost dates: Map with average frost dates

4. Determine what to plant when.
If the seed packet instructions say that the plant can be planted outside after the last frost date and need 6 weeks to grow before transplanting, then count back 6 weeks from your last frost date and plant! For example, I will plant tomatoes inside on April 3rd. Or…..Use a simple computer program to figure it all out for you! This one from Johnny’s is particularly simple, has a clean layout and is easy to use and understand: Johnny’s Seed Planting Schedule
An aside: Although it is tempting to plant all of your seeds inside all at once (the dirt is out, why not?) Dont! Why? Not all plants require 8 or 10 weeks, and if grown too long in a small pot, some plants will actually have permanently stunted growth from being “rootbound”, which means that the roots will grow, reach the edges of their containers and send signals (through a complicated plant hormone system–yes–plants have and USE hormones!) to tell the rest of the plant to slow/stop growth. Not good.
5. Finally: Time to Plant!
a. Moisten the soil mix so that it hold its shape when you hold it in your palm, but not so much that water is squeezed out when you do this.
There are 2 ways to do this: 1. Pour the soil mix into a large container, add water and use a large spoon to mix it up, much like folding in flour into a baking mix. If you choose the mixing method- move to step after soil is mixed.
2. The second option is to fill your cells with dry bagged soil and then let the cells sit in one inch or so of water in a tray, so that the water is soaked through the cells bottom-up. (See step b below for how to fill cells with soil).
After about 15 minutes or so (touch the soil with finger to test it), remove the cells from the water-filled tray and transfer them to a new, dry tray. Do not keep the soil in this water-filled tray. This method tends to be somewhat less messy, but does take up some decent sink space, so I wouldn’t recommend doing this near meal-prep time.


b. Put soil in your chosen cells. I use the 200-cell tray to start lettuce, spinach and other plants that I plant to transplant in a few weeks. I am using the 72-cell tray to start herbs like rosemary and thyme, and the even larger cells for tomatoes (in a few weeks). I like to fill the cells almost all the way to the top, leave between 1/4-1/2 inch at the top. You could fill each cell individually, but I suggest just pouring the soil on top (or scooping with a trowel or large kitchen spoon), and then sweeping the soil into the cells with your hand. I push the soil into the cells gently to pack them a bit tighter which helps when transplanting.


c. Place your seeds in the soil. Read the seed instructions on your packet and follow them. Different seeds will require different soil coverage. A good rule of green thumb is that the smaller the seed is, the less soil you cover it with. However, there are some seeds that should not be covered at all. Generally, I use a small implement like a small spoon or knife to make a tine hole in the top of the soil and place the seed in there, moving the soil from around the hole to cover it afterwards. However, you can also put the seed on the top of the soil and then sprinkle the 1/4″ of soil broadly on the top of all of the cells afterwards. Depending on what I am planting, I will do one or the other.


For very small seeds I find that this nifty tool called the “hand seed sower” from Johnny’s quite useful when I am planting many seeds of the same variety. Otherwise, I make a crease in the seed envelope so that seeds line up single file and tap them into each cell one-by-one (or 2 or 3 or 4…)
 d. Label your cells with name of plant and start date. I usually put one tag at the end of each row and keep my system as consistent as possible. Use 4″ tags for seedlings in trays. Larger tags will not allow the dome top to fit snugly. Write with a pencil. I have yet to find a permanent garden marker to last more than halfway through the season outside. Pencil withstands water and you can reuse plastic tags the following year just be erasing your pencil writing.
e. Mist the top of the soil if it is not already moist, cover with a dome.
6. Place seed tray sandwich on your grow shelf.
If the seed instructions indicate that the seeds need a warmer area than your house temperature, you will need an additional heat source for your seeds. I have purchased several heat mats for this purpose over the years, but they are quite pricey. You can purchase them at your local plant nursery, through the gardening outlets I have mentioned before or through amazon, which is where my latest shipment came from. I like them because it is okay if they get wet, and they fit perfectly beneath 1020 trays.
I have read about more affordable options like using the tiny incandescent Christmas lights, electric blankets and heating pads as heat sources, although I have not tried them myself.
7. Turn on your grow lights for 12-16 hours a day.
The lights should be positioned as close to the dome cover as possible. Keep the heat mat plugged in full-time until the seeds/plants no longer need it (this will vary according to the different plant variety).
8. Water regularly, but let seedlings drain.
This is the hardest part- watering enough, but not too much! I check the seed trays in the mornings and evenings to make sure the soil stays damp enough for the seeds to germinate when they are ready. It is easy to forget about them if they are not in plain sight, so you may want to make this seedling carte part of your routine for a little while.
More about seedling care in the next post: Part 3 of 3. Coming soon!


One thought on “Part 2 of 3: Planning and Planting…..Starting Seedlings Successfully Inside!”